
Document Templates
Document Templates
Overview
The OBS ERP document templates module allows you to present information stored in the OBS ERP modules as PDF documents. For example, you can create:
- A custom template for module Finance → Income that contains a branded invoice aligned with domestic legislation
- A template for module "Contracts" which holds information about the standard contract you sign with your customers
Template Processing Engine
OBS ERP is equipped with a template processing engine called OB1, developed by OBS ERP. It can convert template variables to text. For example:
- In the "Contracts" module, you can use a variable like
~~date_of_issue~~ - OBS ERP will convert this variable to the actual date of issue of the contract
Note: The template processing engine is called OB1 and it is developed by OBS ERP
Accessing Templates
Document templates can be found in module Administration → Templates → Docs. OBS ERP comes with a default set of templates for some of the main modules (Invoices, Quotations, Vacations, etc.).
Note: Do not forget to make a backup of the original template before making any changes
Editing Templates
Let's open one of the most complex default templates - Invoices (navigate to Administration → Templates → Docs → Edit row 1).
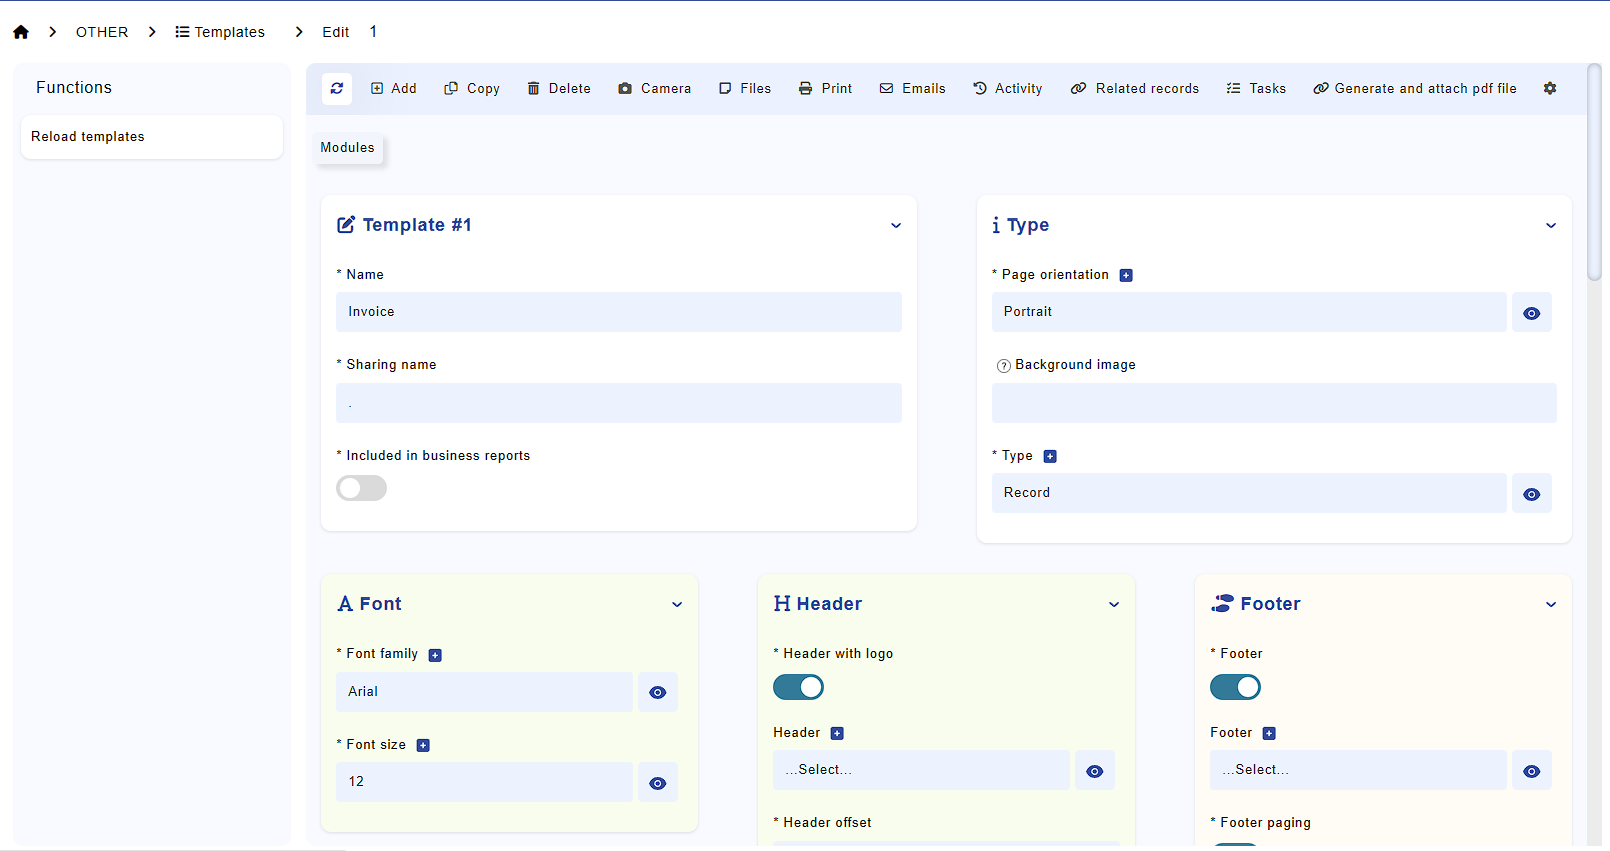
Fig. 1: Template editing interface
In the template editor, you can:
- Set the font type and size
- Add header and footer to the template
- Control the paging
- Select the modules where the template will be applied (click on the 'Modules' button in the top left corner)
Editing Template Contents
Click the "Text" input field to open the template contents:
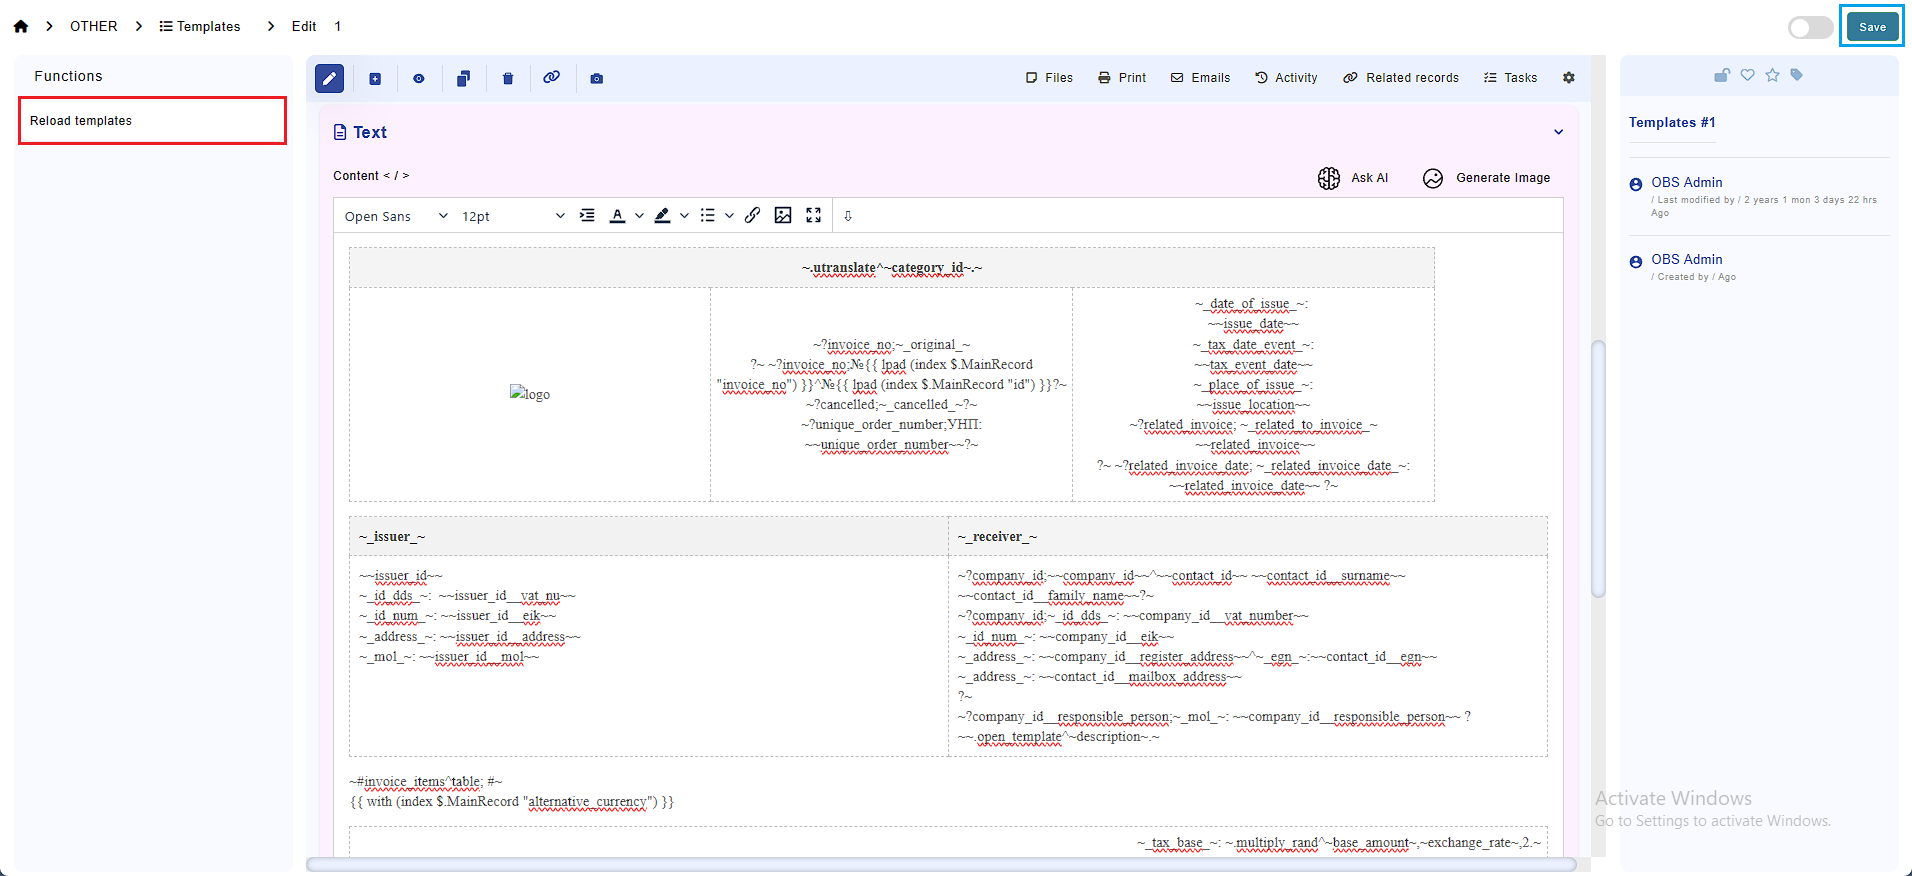
Fig. 2: Template contents editing
To change the contents of a template:
- Make your changes
- Click the "Save" button (highlighted in red in Fig. 2)
- Click the "Reload Templates" button (highlighted in blue in Fig. 2)
To see the end result:
- Open the target module (e.g., "Income")
- Create a record
- Click on the PDF button above the record
Template Processor Features
The template processor supports the following features:
- Variables
- Functions
- Text replacement
- Loops
- Conditional evaluation
Showing Available Variables
To check which variables are available for a specific module:
- Write the following function anywhere in the template:
~.show_vars.~- Click save and reload
- The result will be visible in the target module, for example:
| VAR | VALUE |
|---|---|
| amount | 8700.00 |
| contract_id | 2015-09-23 №28 Test Customer |
Using Variables
To display the value of a variable, use the following enclosing sequence:
~~variable~~Creating Tables with Values
Enclosing sequence for an auto-layout table:
~#table_name^table #~Each column is represented by its corresponding variable, enclosed in double tildes (~~).
Custom Columns
To customize which columns appear in the table and their order, define them explicitly between the delimiters:
~#table_name^table; ~SEQ~ ~name~ ~qty~ ~price_per_unit~ ~discount~ ~line_total~#~Custom Plain Values
This format does not generate a table.
Instead, it loops through all records in the related table (table_name) and displays each record as a block of custom-formatted text.
You define the structure of the output using plain text and template variables.
~#table_name^plain; #~SEQ~: Name: ~name~ Qty: ~qty~ Price: ~price_per_unit~ Total: ~line_total~#~Skip Certain Columns
You can create a table and explicitly exclude certain columns from being displayed.
To do this, use the skip: directive followed by the names of the columns you want to omit, separated by semicolons.
~#table_name^table; skip:description;comments;#~Custom Header Tables
To create a table with a custom header layout, use the table_with_custom_header: directive, followed by the name of a header template and the list of columns you want to display.
About thead_template:
- thead_template refers to a separate document template defined in the same module.
- This template must contain a single table row with the column headers.
- The best practice is to avoid setting fixed widths, so that the table adjusts automatically based on content.
- However, you may define column widths if needed for alignment or design consistency.
- Styling (e.g., background color, text color, font weight) will be applied only to the header row.
- Borders will be applied automatically to all rows, including both header and data rows.
~#table_name^table_with_custom_header:thead_template;~name~ ~qty~ ~price_per_unit~ ~discount~ ~line_total~#~Conditional Evaluation
Basic Conditional Display (Short Syntax)
To display a value conditionally, you can use the following syntax:
~?variable; ?~Or, to display a specific message if the variable is set and an alternative message if it is not set:
~?variable; displayed if set ^ displayed if not set ?~Example:
~?description; This is a description: ~~description~~ ?~If the description is not set, you can also use:
~?description; This is a description: ^ Text displayed in case description is not set ~~description~~ ?~Advanced Conditions (Full Logic with {{ if }})
For more advanced evaluations - like comparing numbers, booleans, or strings - use Go templating syntax:
Example 1 – Numeric Comparison
Check if a field equals a specific number (e.g. 1):
{{ if eq 1 (index $.MainRecord "paid_by_numeric") }} ☑ {{ else }} ☐ {{ end }}This displays a checkbox (☑) if the value is 1, otherwise an empty box (☐).
Example 2 – Boolean Evaluation
Check if a checkbox field is set to true:
{{ if eq true (index $.MainRecord "receiver_address_contact_and_delivery_address_of_goods") }} ☑ {{ else }} ☐ {{ end }}Use this pattern for toggles, checkboxes, "yes/no" fields or text depending on checkbox fields.
Example 3 – Text Comparison (Multiple Conditions)
Display different outputs based on text values:
{{ if eq (index $.MainRecord "issuer_id") "Company 1" }} Info 1
{{ else if eq (index $.MainRecord "issuer_id") "Company 2" }} Info 2
{{ end }}
This shows “Info 1” if the issuer is Company 1, and “Info 2” if it is Company 2.
Notes:
- index $.MainRecord "field_name" retrieves the value of a specific field.
- Always close your if blocks with {{ end }}.
- eq is short for "equal to"; you can also use other comparison functions like ne (not equal), lt (less than), gt (greater than), etc.
Displaying HTML Code
To display a variable containing HTML code, use:
{{ open_template (index $.MainRecord "comment") }}Importing Templates
Import a template using:
~.import^template_name.~Date Formatting
Example of date formatting syntax:
~.format_date^~created_at~,2006-01-02.~Printing Statuses
Print a table with audit trail if status_id is enabled in the module:
    <div class="grid" style="display: grid; width: 100%; grid-template-columns: 33% 33% 33%; column-gap: 0.5rem; row-gap: 0.5rem;">
      <div style="font-weight: bold;">~_time_~</div>
      <div style="font-weight: bold;">~_employee_~</div>
      <div style="font-weight: bold;">~_status_~</div>
      {{ range $a, $b := $.Statuses }}
      <div style="border: solid 1px #ececec;">{{ format_time_to_minute $b.Time }}:</div>
      <div>{{ $b.Employee }} -></div>
      <div>{{ $b.Status }}</div>
      {{ end }}
    </div>
Instance Host (HTML output)
Use this to print the current instance host (e.g., your company’s domain or subdomain):
{{ vhost }}Company Logo (Safe Image Rendering)
Renders the company logo in the template:
{{ safeURL $.CompanyLogo }}Convert Number to Text
Converts a numeric value to its text representation (e.g., 1200 → "one thousand two hundred"):
{{ num_to_text (index $.MainRecord "salary") "" }}